How to Take Measurements for Blouse Cutting and Stitching: A Complete Step-by-Step Guide
Introduction
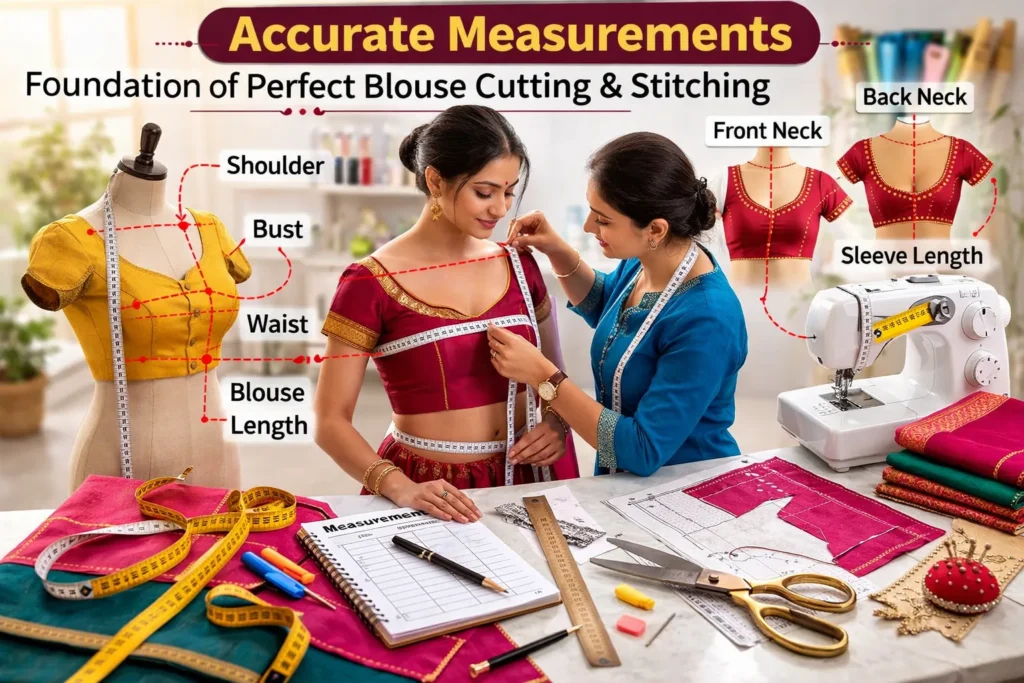
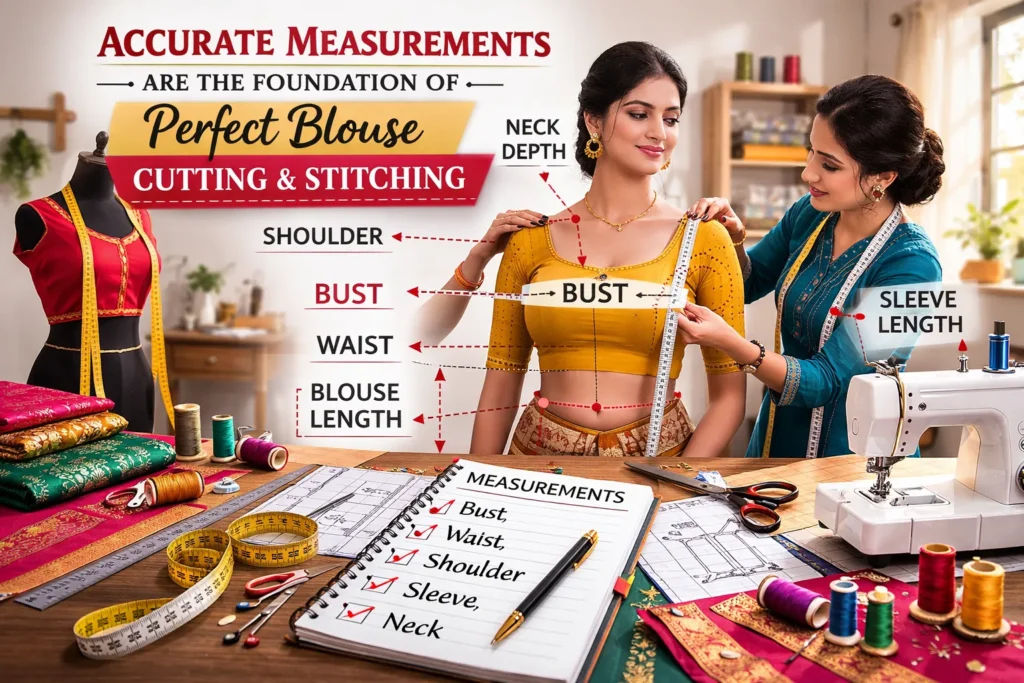
A perfectly stitched blouse does not begin with fabric or design. It begins with accurate measurements.
Many beginners spend hours selecting sleeve styles, neck patterns, blouse back designs, and fancy fabrics. But when the final blouse feels too tight at the bust, loose at the shoulder, or uneven at the neckline, the real mistake often happens before the cutting even starts. That is why learning how to take measurements for blouse Cutting and stitching is one of the most important skills in tailoring.
Whether you are a beginner, a boutique owner, or someone who stitches blouses at home, understanding measurements can save time, reduce alterations, and improve blouse fitting dramatically. In this guide, you will learn the full step-by-step process, important measurement tips, common mistakes, and practical insights that make blouse stitching easier and more accurate.
Why Accurate Measurements Matter in Blouse Stitching
A blouse is a fitted garment. Unlike loose tops, it needs to sit neatly around the bust, shoulder, waist, neckline, and armhole. Even a small mistake can affect the final look and comfort.
For example, an incorrect bust measurement may make the blouse too tight. A wrong shoulder measurement can cause drooping or pulling. A poorly measured armhole may limit movement and make the blouse uncomfortable.
Benefits of Accurate Blouse Measurement
- Better fitting
- Less alteration work
- Cleaner cutting
- More professional stitching
- Better comfort and appearance
When measurements are correct, every step after that becomes easier.
Before You Start Measuring
Before learning how to take measurements for blouse Cutting and stitching, make sure everything is prepared properly.
Tools You Need
- Soft measuring tape
- Notebook or blouse measurement chart
- Pen or pencil
- Mirror
- Tailor’s chalk
- A helper, if possible
Preparation Tips
- Wear a well-fitted bra or innerwear
- Stand naturally and comfortably
- Do not pull in your stomach
- Keep shoulders relaxed
- Measure twice for accuracy
Pro Tip: Tie a string around the natural waist before measuring. It helps find the correct waist point easily.
Body Measurement vs Finished Blouse Measurement
This is one of the most important concepts in blouse stitching.
Body measurement means the exact size of the body.
Finished blouse measurement means the final size of the stitched blouse after adding ease and seam allowance.
Measurement Comparison Table
| Measurement Type | Meaning | Purpose |
|---|---|---|
| Body Measurement | Actual size of the body | Base for cutting |
| Ease | Extra room for comfort | Better movement |
| Seam Allowance | Extra fabric for sewing | Stitching support |
| Finished Measurement | Final blouse size | Actual fit after stitching |
A blouse should fit nicely, but it should never feel too tight or restrictive.
Essential Measurements for Blouse Cutting and Stitching
Now, let us go through the most important measurements one by one.
1. Bust Measurement
Measure around the fullest part of the bust. Keep the tape straight across the back and snug across the front.
This is one of the most important measurements because it controls the overall fit of the blouse.
2. Upper Bust Measurement
Measure above the bust, under the arms, across the upper chest.
This helps create a more balanced fit, especially for structured blouse patterns.
3. Waist Measurement
Measure around the natural waistline.
This helps shape the blouse correctly around the waist area.
4. Shoulder Measurement
Measure from one shoulder point to the other across the back.
A correct shoulder measurement is very important for neckline shape, sleeve fitting, and blouse balance.
5. Armhole Measurement
Measure around the arm joint where the sleeve will be attached.
A badly measured armhole can make the blouse too tight or too loose.
6. Sleeve Length
Measure from the shoulder point to the desired sleeve length.
This can be short sleeve, elbow sleeve, or full sleeve.
7. Sleeve Round
Measure around the arm where the sleeve ends.
Always leave enough comfort for movement.
8. Blouse Length
Measure from the high shoulder point down to the desired blouse length.
Too short may look awkward, and too long may not sit properly with a saree.
9. Front Neck Depth
Measure from the shoulder near the neck down to the desired front neckline depth.
Always confirm this carefully before cutting.
10. Back Neck Depth
Measure from the back neckline downward to the required back neck depth.
This is especially important for deep back blouse designs.
11. Bust Point Measurement
This helps place darts correctly and gives a better blouse shape.
Many beginners ignore this, but it makes a major difference in fitting.
Best Order for Taking Blouse Measurements
To avoid confusion, use this sequence:
- Upper bust
- Full bust
- Waist
- Shoulder
- Blouse length
- Front neck depth
- Back neck depth
- Armhole
- Sleeve length
- Sleeve round
- Bust point
This order helps maintain consistency and reduces mistakes.
Common Mistakes to Avoid
Pulling the Tape Too Tight
This creates a blouse that feels uncomfortable after stitching.
Measuring Over Loose Clothes
Always measure over proper innerwear, not over bulky clothing.
Ignoring Ease
A fitted blouse still needs a little room for movement.
Guessing Neck Depth
Do not guess. Always confirm front and back neck depth.
Forgetting to Recheck Measurements
Even a small mistake can affect the final fit.
Tailor’s Insight: Measurements Are More Than Just Numbers
This is where good tailoring becomes great tailoring.
Knowing how to take measurements for blouse Cutting and stitching is not only about recording numbers. It is also about observing body shape, shoulder slope, bust shape, design preference, and fabric type.
For example:
- A princess-cut blouse fits differently from a simple dart blouse
- A padded blouse may require a slight bust adjustment
- Stretch fabric needs less ease than cotton fabric
- Heavy embroidery can affect fit and drape
That is why experienced tailors combine measurement with observation.
Sample Blouse Measurement Chart
| Measurement | Example |
|---|---|
| Bust | 36 inches |
| Upper Bust | 34 inches |
| Waist | 30 inches |
| Shoulder | 14 inches |
| Armhole | 16 inches |
| Sleeve Length | 6 inches |
| Sleeve Round | 11 inches |
| Blouse Length | 14 inches |
| Front Neck Depth | 7 inches |
| Back Neck Depth | 10 inches |
| Bust Point | 8 inches apart |
You can use this as a sample format for customer measurement records.
Conclusion
Learning how to take measurements for blouse Cutting and stitching is one of the most important steps in blouse tailoring. Accurate measurements improve fitting, reduce mistakes, and help create a blouse that looks neat and feels comfortable.
The biggest secret is simple: do not rush. Measure carefully, check twice, and understand what each measurement actually controls. Once you build this habit, blouse cutting and stitching become much easier and more professional.
Call to Action
Did this guide help you understand blouse measurement better? Share this post with someone learning tailoring, and explore more blouse cutting and stitching tutorials on our website for better fitting and cleaner finishing.
FAQs
No. The tape should rest comfortably on the body without squeezing. Tight measurements can make the blouse uncomfortable.
Body measurement is the actual size of the body, while blouse measurement includes ease and stitching allowance.
It depends on the design and fabric, but usually a small amount of ease is added for comfort and movement.
Bust point measurement helps place darts properly and gives a better shape to the blouse.
One of the most common mistakes is pulling the measuring tape too tight or measuring over loose clothing.